However, to help understand the process, we have broken down the payment flow into 3 types of communication:
- Orange arrows - communications between your own systems.
- Blue arrows – the various APIs that you need to call; and redirects and webhooks to configure to integrate with Yaspa.
- Green arrows – API calls made and managed by Yaspa. You don’t need to understand these, but in short, this simply means that Yaspa will take over the user payment and interface with the banks.
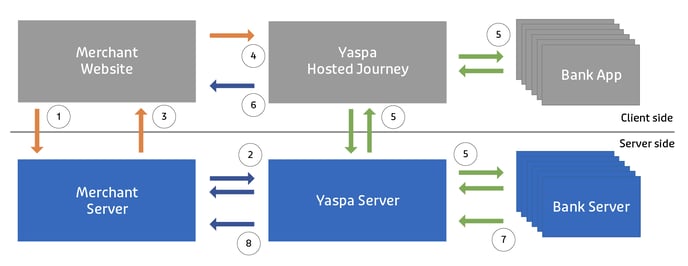
In this phase, the customer chooses to make a payment - they might choose the amount for a wallet-based application or the amount might be set by a basket of goods as you would expect to see with say a shopping application. A request is sent to the server to start the payment process.
2. Generate payment instruction or linkThe merchant server validates that the customer is allowed to make the payment for the stated amount. The merchant server then makes an API call to the Yaspa server to instruct the payment.
Payment instructions require the merchant API key to be sent in a header with the request, and for security reasons, this request must be made from the server.
The Yaspa server returns a payment URL or Yaspa transaction ID to the merchant server.
3. Send the Yaspa payment response to the client.The merchant server sends the payment URL or Yaspa transaction ID to the merchant client.
4. Hand off customer to YaspaThe merchant client opens the payment URL in an iframe or new window, or if a Yaspa transaction ID is returned, the Yaspa SDK is used to open a container.
5. Yaspa completes the payment with the bankYaspa will open a window for the customer, allowing them to select their bank. Then Yaspa will take them through a multi-step journey of checking the payment and authorising it with the bank.
6. The customer is redirected back to the client-siteOn completion of the payment - either by the payment succeeding, cancelling or failing – the customer will be redirected by Yaspa back to the merchant website. This URL is configurable by the merchant.
7. Bank notification on payment statusAfter a payment has been submitted, Yaspa will receive updates from both of the banks:
- For pay-ins – we receive payer and payee bank notifications.
- For payouts – we receive payer bank notifications.
Bank notifications are passed on to the merchant server, based on what webhook notifications are configured in the admin dashboard.